
Monday, March 7, 2011
RIP Cookie Girl
Last week, one of my kitties passed away suddenly. Cookie came to us about 11 years ago. My daughters and I attended a swim party to celebrate the end of softball season. The family who hosted the swim party had a young litter of kittens...and boy were they cute, but they were all black kittens. We didn't have a very good history of owning black cats (we had 3 black kitties, at different times, and each one never made it much past 2 years of age) so I said NO MORE BLACK KITTIES! Well, then someone brought out this cute little gray kitty and darn it...lol...home she went with us. Cookie was a little on the timid side and was not very sociable with guests in our house. But when it was just the family, she was very much a lap kitty. As soon as you sat down, she would come plop on your lap, purr up a storm and keep you nice and toasty warm. We will all miss Cookie very much, especially our other cat, Milo. Here's a picture of both Milo and Cookie.

Wednesday, March 2, 2011
So Many Birthdays!
March is a busy birthday month for me! Luckily for me, I can do doubles of some cards because a lot of my birthday buddies don't know each other, i.e, co-workers, friends, stamping buddies, etc. I've seen a lot of stampers use the scallop punch to make flowers. I decided to try the Extra Large Fancy Flower punch from Stampin' Up instead of the scallop punch. I punched 6 flowers, used one for the base and I softened the other 5 with my bone folder until the cardstock separated so I could peel the layers apart leaving me with 10 thin flowers. But before I peeled the flowers apart, I crumpled each flower into a ball and opened them back up again. The crumpled look makes the flower look more realistic. After peeling the flowers apart, I put those 10 pieces of paper together (I flipped some of them over, too) turning the petals so they weren't all exactly in the same place, added the base flower and punched a hole in the middle and added a brad. You can now put adhesive on the base and stick the flower to the card. You can add leaves if you want. I chose not to on this card.

Cardstock colors are Basic Grey (base), Early Expresso, Rose Red and Whisper White, all from Stampin' Up. The designer paper is from an Asian pack of paper I have and I can't remember where the gray cordoroy brad is from. "CELEBRATE YOU" is from Stampin' Up's "A Little Birthday Cheer" set.

Tuesday, March 1, 2011
Sean's a Teenager!
I'm posting 2 cards that were made for my girlfriend's son. I can't believe he's 13 already! I remember the day she told me she was pregnant because I really didn't think she would ever have any children. When I was pregnant and carting my kids around everywhere, she pretty much stayed away...lol. Her exact quote? "Babies make me nauseous! LOL Well, turns out she's a wonderful mom and she is raising a wonderful son.
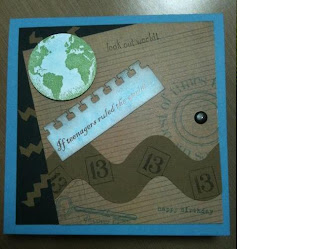
This 5 1/2' square card was inspired by a card I saw on Blue Mountain Cards. With a little help from some of my coworkers, we came up with a half dozen "teen rules" customized to the birthday boy with the exception of one idea from Blue Mountain...it was a saying too good to pass up! Cardstock colors are Marina Mist, Early Expresso, Soft Suede and Whisper White. The lined paper is from Basic Gray with several miscellaneous dollar stamps on it stamped in Marina Mist. "If teenagers ruled the world" was printed on the computer, the "13" is part of a Tim Holtz stamp, "happy birthday" is from Stampin' Up's set, "Plane & Simple" and the world is a stamp from Comotion. I got a chance to use my newest Sizzix die from Stampin' Up and EK's spiral border punch.

This 3 x 6 card is for the same boy, but from my son. My son is taking him to a Phillies game so I used Stampin' Up's "Home Run" set. I used a background stamp (Sanded) from Stampin' Up using Sahara Sand ink on Sahara Sand cardstock. The baseballs are also stamped in Sahara Sand. "Birthday wishes" is stamped in Real Red and is from Stampin' Up's "So Happy for You" (hostess) set. I added three red brads for balance and left the inside blank for a personal note.


This 3 x 6 card is for the same boy, but from my son. My son is taking him to a Phillies game so I used Stampin' Up's "Home Run" set. I used a background stamp (Sanded) from Stampin' Up using Sahara Sand ink on Sahara Sand cardstock. The baseballs are also stamped in Sahara Sand. "Birthday wishes" is stamped in Real Red and is from Stampin' Up's "So Happy for You" (hostess) set. I added three red brads for balance and left the inside blank for a personal note.
Monday, February 28, 2011
Wine, Anyone?
Presidents' Day weekend I was invited on a girls' get together to the Seneca Lake, NY area for a wine tasting weekend. We arrived Friday afternoon and the weather was beautiful, probably 60-65 degrees. We ate dinner at a nice Italian restaurant and headed back to the hotel to start our weekend playing a drinking card game called, "Drinkmaster Says." After the fire alarm went off at midnight (thanks to a group of high school kids staying at the hotel after the "senior dinner dance") we hit the sack.
And what did we wake up to on Saturday morning? A blizzard! Thank God, a driver had been arranged to drive us to all the wineries. Rob took great care of us and we spent the entire afternoon tasting A LOT of different wines. I'm not a wine drinker, but I did have fun tasting the different types of wines and each winery had their own "theme" which made it all the more fun. I've decided I don't like the sweet wines, especially by the end of the day, they were almost sickening. I definitely don't like the red wines, either.
Anyway, I'm always looking at stamping blogs, sites, etc. and I saw this card made by Bev W. before I went on the trip. I knew I wanted to make this card to thank my friend for including me on the trip. Bev's owl was holding a mug of beer but of course, I needed to have the wine glass.

My friend's favorite color is purple so I used Elegant Eggplant as the card base. I used a woodgrain sheet of DP from Woodland Walk and sponged it with Early Expresso to make it a little darker. The moon is sponged with Marina Mist and Early Expresso. All the parts of the owl are part of one punch from Stampin' Up and the leaves are a punch also. The wine glass is an Inkadinkado stamp.
And what did we wake up to on Saturday morning? A blizzard! Thank God, a driver had been arranged to drive us to all the wineries. Rob took great care of us and we spent the entire afternoon tasting A LOT of different wines. I'm not a wine drinker, but I did have fun tasting the different types of wines and each winery had their own "theme" which made it all the more fun. I've decided I don't like the sweet wines, especially by the end of the day, they were almost sickening. I definitely don't like the red wines, either.
Anyway, I'm always looking at stamping blogs, sites, etc. and I saw this card made by Bev W. before I went on the trip. I knew I wanted to make this card to thank my friend for including me on the trip. Bev's owl was holding a mug of beer but of course, I needed to have the wine glass.

Thursday, February 17, 2011
My First Day
OK, I'm starting a blog. Everyone's doing it, right? I've always wanted to have a blog but feared that I wouldn't have enough to say. I can honestly say the "stamping bug" has bitten me. I was introduced to stamping about four years ago by my girlfriend. She wanted to have a "Stampin' Up" party at my house because she lived on a busy road and didn't have enough parking for guests at her house. I said OK but that I wouldn't be buying anything because I was a cross-stitcher and I didn't want a new hobby. Little did I know that I would be sucked in to the world of rubber stamps and designer paper and I haven't looked back since. She and I just laugh when we see all the stamping supplies we have accumulated over the past four years...and then we cry when we look at our bank accounts...LOL And guess what? I have not picked up cross-stitching in four years...LOL...maybe in my golden years, I'll get back to that hobby.
Since Valentine's Day was this week, I'll post the cards I made for my 3 children, a son and two daughters, and my Mom.

This card was for Mommasan. Cardstock colors are Whisper White, Basic Black and Real Red from Stampin' Up. The bird (red foil paper) and vine is a punch, also from Stampin' Up. I used a Cuttlebug embossing folder for the panel behind the bird and another strip of white was punched with one of Martha Stewart's edge punches. Ribbon by WalMart and "happy valentine's day" is from Stampin' Up's "Teeny Tiny Wishes" set.

I don't know why this pic is upside down. Does anyone know how to fix that? My son is 27 so I wanted to make a masculine valentine. I had a sheet of designer paper for "Sons" and chose Marina Mist and Chocolate Chip cardstock (Stampin' Up) instead of traditional valentine colors. The 3 different sized hearts are combined on one punch (Heart to Heart) from Stampin' Up also. I punched the hearts out after I embossed a strip of Chocolate Chip with an embossing folder from Stampin' Up to give them a more rugged look. Marina Mist is sponged on the wings on the watch and around the edges of the designer paper. I chose to use the watch w/wings stamp (Stampers Anonymous) because of the sayings on the paper. I cut the image out and popped it.
Photo removed
This card was for my oldest daughter and totally CASE'd from a very good friend. I love the postcard stamp...I think it's Impression Obsession. To give the card a vintage look I sponged Rich Razzleberry and on the DP and little envelope (I have a punch for that) and the postcard has Rich Razzleberry and Crushed Curry sponged on it also. The bird stamp is from a set from Stampin' Up called "Carte Postale." The colors of cardstock used are Rich Razzleberry and Very Vanilla and some miscellaneous DP, and ink colors used are Rich Razzleberry, Crushed Curry and Early Expresso. In case you don't know, "MA FILLE" means "my daughter."

This last card was for my youngest daughter. We made this card at "Stampede", thanks to Maryanne. Hearts were embossed on the white cardstock using a Cuttlebug folder. There is no stamping on the front. The pinwheel was made alternating small squares of DP. Just gluing one corner of each square down enabled you to curl the other side up, making it look like a pinwheel. The white cardstock, red glitter paper and the dotted paper are all from Stampin' Up.
Since Valentine's Day was this week, I'll post the cards I made for my 3 children, a son and two daughters, and my Mom.


I don't know why this pic is upside down. Does anyone know how to fix that? My son is 27 so I wanted to make a masculine valentine. I had a sheet of designer paper for "Sons" and chose Marina Mist and Chocolate Chip cardstock (Stampin' Up) instead of traditional valentine colors. The 3 different sized hearts are combined on one punch (Heart to Heart) from Stampin' Up also. I punched the hearts out after I embossed a strip of Chocolate Chip with an embossing folder from Stampin' Up to give them a more rugged look. Marina Mist is sponged on the wings on the watch and around the edges of the designer paper. I chose to use the watch w/wings stamp (Stampers Anonymous) because of the sayings on the paper. I cut the image out and popped it.
Photo removed
This card was for my oldest daughter and totally CASE'd from a very good friend. I love the postcard stamp...I think it's Impression Obsession. To give the card a vintage look I sponged Rich Razzleberry and on the DP and little envelope (I have a punch for that) and the postcard has Rich Razzleberry and Crushed Curry sponged on it also. The bird stamp is from a set from Stampin' Up called "Carte Postale." The colors of cardstock used are Rich Razzleberry and Very Vanilla and some miscellaneous DP, and ink colors used are Rich Razzleberry, Crushed Curry and Early Expresso. In case you don't know, "MA FILLE" means "my daughter."

This last card was for my youngest daughter. We made this card at "Stampede", thanks to Maryanne. Hearts were embossed on the white cardstock using a Cuttlebug folder. There is no stamping on the front. The pinwheel was made alternating small squares of DP. Just gluing one corner of each square down enabled you to curl the other side up, making it look like a pinwheel. The white cardstock, red glitter paper and the dotted paper are all from Stampin' Up.
Subscribe to:
Posts (Atom)